
For Textile Designers
Tutorial - preparing the sewing pattern files for use with your fabric designs.
Welcome!
If you don't already have access to my sewing pattern files, click here
If you're not a textile designer but would like see the sewing projects, click here
Please let me know if you have questions, so I can make sure everything is easy to understand. (You are my Beta testers.) Also, please do not change any parts of the file other than what I've shown below. I'd like our customers to know what to expect when they purchase a certain pattern (for example, if they sew one set of MPH0001 pillows and then wish to buy another from a different designer, I want them to expect the pillows to assemble and fit the same way each time). If you really feel that a sewing pattern needs to be changed, please let me know and I can make your version of the pattern available as another item.
Here's the tutorial to show you how to insert your textile designs on to my sewing patterns and display sketches:
Tutorial

You may see the following message when you download some of my larger files. You can just ignore it and click "here"
. Sewing Pattern Files:
|
Open the template file in Photoshop |
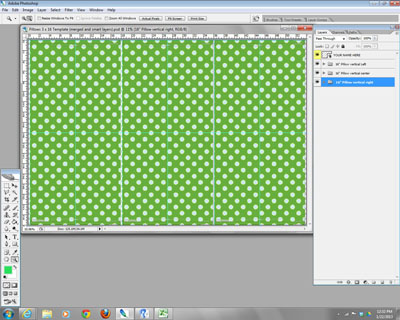
Make sure the "Layers" window is open. (It can be opened by selecting "Window">"Layers"). The layers highlighted in yellow are ones that you should change (please leave the others alone). On some patterns, I also have some purple highlighted layers that are optional to change. |
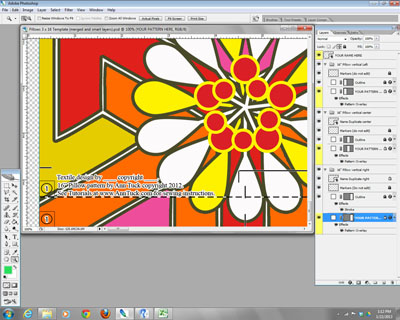
Expand each pattern group (by clicking the arrowhead on the left side of the group), and select the a yellow highlighted layer called "YOUR PATTERN HERE". Then double-click the "Pattern Overlay" effect underneath. (If you don't see "Pattern Overlay" then expand the layer by clicking the arrowhead at the right of the layer) |
The "Layer Style" dialog box will appear. Click the little arrow to the side of the pattern tile and select your pattern you would like to use. (If you haven't already defined your textile patterns in Photoshop, simply open your repeat pattern tile in Photoshop, select the tile, choose Edit>Define Pattern, name your pattern and click "OK". You then should be able to select your pattern in the "Pattern Overlay" section of the "Layer Style" dialog box.) |
The "scale" should be set to 100%, but you can change that if you'd like to enlarge or shrink your design. If you'd like to center your design on the pattern piece as I did above, simply deselect "Link with Layer", and grab the overlay on the pattern piece to move it around. Now do the rest of the pattern pieces marked "YOUR PATTERN HERE" and highlighted in yellow. |
Now, we need to make sure you are given credit as the textile designer on the fabric (this is printed on the seam allowance, so it will not show on the finished piece). I've used Smart Objects so that you'll only need to change the text on one layer and the others will be changed automatically. |
Find the layer labeled "YOUR NAME HERE" and double click on the boxy shape to the left of the label. You'll see a dialog box that talks about saving the edits in the smart object that will appear next. Click "OK" |
You'll see a box where you can edit the text to add your name and copyright date. From your toolbox, (shown at the left of this screen), select "T" to edit text, and then add your name and copyright date to the box. |
Then click the close button on the box (red x) and another dialog box will appear asking you to commit your changes. Click "Commit" |
One more dialog box will appear asking you to save your changes. Click "Save" |
Now you should see your name on all of the pieces
Now you're ready to save your file and upload to Spoonflower. I save mine as .JPG and use the RGB color mode . Note that if you use another color mode, your colors may not display well on the Spoonflower site.
|
After you load your design on to Spoonflower, you can add some keywords that will help people find your designs. The first "Maidenhair Patterns" (make sure to use the quotes) will make sure your designs are included in any searches for our patterns. The second is the pattern number such as MHP001 found on your pattern file. Using the pattern number as a keyword, will allow someone who learns how to sew one of our pillow patterns to find more in new fabrics. |
On the download page for each pattern, I'll give more details on how to show keywords, the fabric for each pattern, and links for tutorials.
Display Sketches:
I thought I should also give you something you could use to show off how your designs will look on the finished sewing project, so I created sketches you can insert your textile pattern in and display online as project images in Spoonflower, or other places like Pinterest, your blog, etc.
As with the sewing pattern files, I've highlighted the layers that you should change in yellow. The layers highlighted in purple are ones that you can change only if you want to (In this case, the wall color and bedspread color or pattern). The layer "YOUR NAME HERE" is used to credit you as the textile designer. Simply insert your name in the text layer. |
Now simply insert your pattern on each element of the sketch as was shown on the sewing pattern tutorial above. Remember you can change the scale with the slider bar and move the pattern around on the project by deselecting "link with layer" if you like. |
You can also choose to change layers highlighted in purple if you like. Shown here, you can change the wall color or insert a pattern overlay or color overlay onto the bedspread. |
When the display sketch is complete, save your image as a .jpg file and use it to promote your designs. |


